


How We Built a Simple Farm Gate Using Leftover Materials
At almost every farm or homestead, there’s usually a pile of leftover materials lying around — extra lumber, spare screws, fencing wire, and other miscellaneous items. When it comes to small construction jobs, farmers often think resourcefully and economically. Why spend more when you can build something useful from what you already have?
That’s exactly what we did when we needed a simple gate to keep the dogs secure on our patio.
Why We Built the Gate
We needed a smaller gate that would fit a specific space, but all of the existing gates on the property were too large. Rather than cutting down a larger gate or buying new materials, we decided to build one ourselves using what we had on hand.
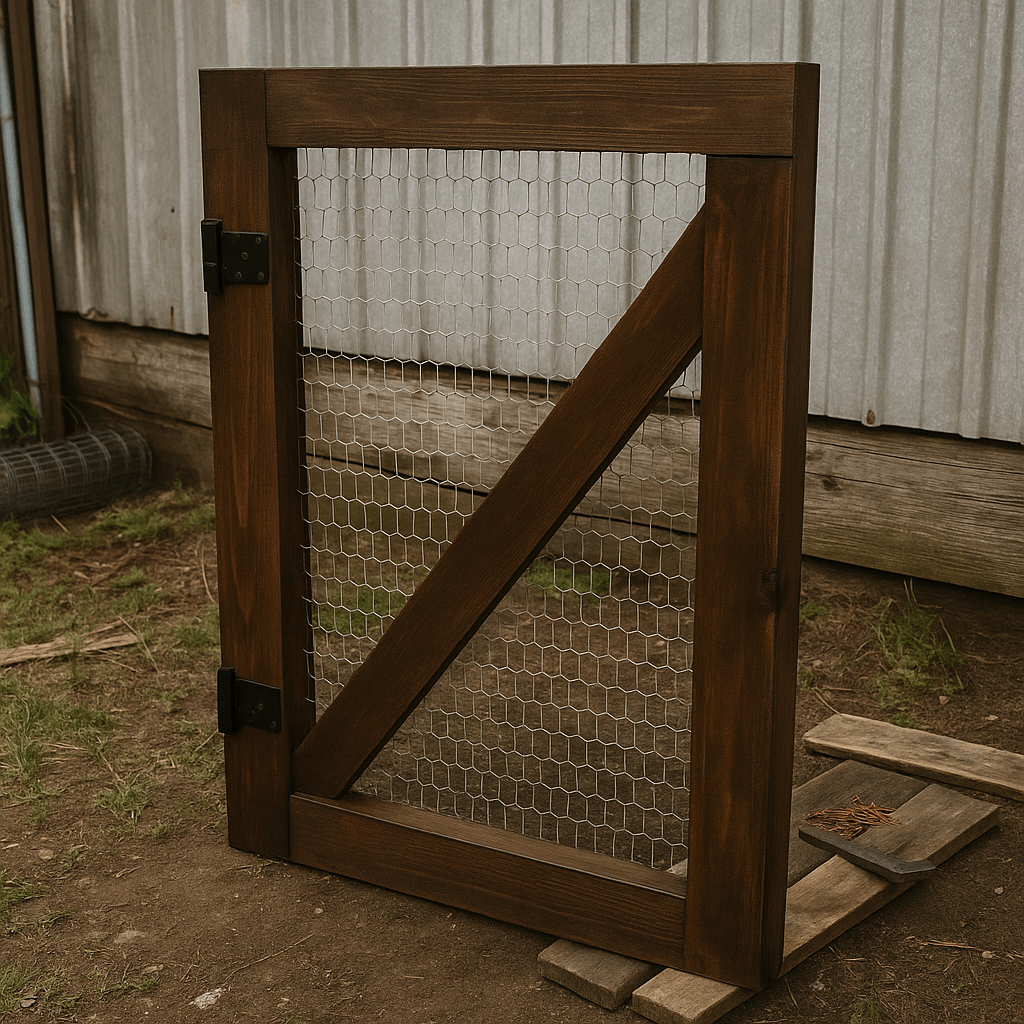
Materials We Found Around the Farm
-
2x6 Lumber – Perfect for framing the gate.
-
Chicken Wire Mesh – Great for filling the gate and keeping animals in.
-
Pocket Screws and Wood Glue – Ideal for assembling the gate frame.
-
Leftover Stain and Teak Oil – Provided a durable and attractive finish.
The only thing we needed to purchase was a set of heavy-duty hinges, which cost about $15.
Step-by-Step Gate Construction
-
Measure the Opening
We carefully measured the gate opening, accounting for hinge thickness and swing clearance. -
Cut the Lumber
We cut our 2x6 lumber to size and added a diagonal brace for extra rigidity. -
Assemble the Frame
Using stainless steel pocket screws and wood glue, we assembled the gate frame. Pocket screws provide strong, hidden joints and are faster than traditional joinery like dowels. -
Stain and Seal the Wood
We applied a dark walnut stain mixed with teak oil to protect the wood from the elements and give it a finished look. -
Install the Wire Mesh
We cut the chicken wire mesh with a grinder and stapled it in place using 1-inch fence staples and a hammer. This step adds security without adding much weight. -
Mount the Gate
Using blocks and clamps for alignment, we installed the hinges and mounted the gate to the post. The result? A secure and functional farm gate built with minimal cost and effort.
Benefits of Building with What You Have
-
Cost-effective – We only spent $15 on hinges.
-
Reduces waste – Using leftover materials prevents clutter and saves money.
-
Custom fit – Tailor your gate or project to exact dimensions.
Watch the Build
You can watch the full short video of the farm gate construction here: [Insert YouTube Link]
Organize Your DIY Projects
Want to keep your tools organized while building? The ALLJEET Leather Toolbelt helps keep all your essential tools at your fingertips, with smart pocket designs and durable construction.
For more DIY, farming, and homestead content, be sure to subscribe to our YouTube channel and visit our website:
Let us know in the comments how you’ve built your own gates or small farm structures using leftover materials!


Leave a comment (all fields required)